Inputting Content
Creating & Formatting Tables
Tables are input into the XML editor in an identical manner to other documentation applications, such as Word, Google Sheets etc. Tables which are formatted in the editor are defined initially in the main stylesheet associated to the topic, however, table elements have their own stylesheets owing to the complexity of the style settings.
Styles for tables appear in the main stylesheet as <table>; rows are formatted as <tr> and the text within the rows/columns is formatted as <td>. All table styles have the following settings :
General
This contains style elements for :
-
Margins
-
Outer Borders
-
Border Radius
-
Background
-
Cell Border Spacing
-
Cell Padding
Rows & Columns
This contains style elements for :
-
Row/Column Styles
-
Row/Column Style Properties
-
Font
-
Background
-
Alignment
-
Cell Padding
-
Cell Content Style
Header
This contains style elements for the header field of the table, such as :
-
Header Styles
-
Style Properties such as font height,
-
Background
-
Separator
-
Alignment
-
Cell Padding
Footer
This contains style elements for the footer field of the table, such as :
-
Footer Styles
-
Style Properties such as font height,
-
Background
-
Separator
-
Alignment
-
Cell Padding
Multiple styles can be used when creating columns within a table. An example is shown below :

Formatting the 'Rows' stylesheet
Inserting Tables into the Editor
Tables containing multiple rows and columns are inserted into the editor using the Table > Insert Table tool. Use the dropdown selection to define how many rows and columns are required.
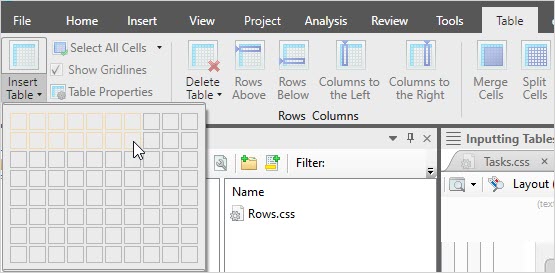
Inserting a table into the editor
Formatting Tables to a Style
When a table is inserted into the editor, a generic table, formatted in the main stylesheet is created.
To assign the properties of a Table Stylesheet to a table, do the following :
-
Navigate to Table > Insert Table, then select the number of columns and rows are required.
-
The inserted table is annotated as <table> in the left block structure bar, shown below.

Formatting the Table Style
-
Right click onto the <table> tag and select Table Style from the context menu. A list of pre-defined table styles will be available.
| Header 1 | Header 2 | Header 3 |
| Row 1 Col 1 | Row 1 Col 2 | Row 1 Col 3 |
| Row 2 Col 1 | Row 2 Col 2 | Row 2 Col 3 |
| Footer 1 | Footer 2 | Footer 3 |
Row/Column Sorting
Ascending or descending order of data in the columns or rows is done by right-clicking onto the <table> tag in the left structure bar and selecting Sort Rows > Ascending/Descending from the context menu.
Table Caption
A caption at the header or footer of the table can be inserted by right-clicking onto the <table> tag in the left structure bar and selecting Caption > Above/Below Table from the context menu.
Changing Table Properties Locally
Changing the style of the table in the associated table stylesheet will cascade these updates to all inserted instances of the table throughout the documentation. However, in-place style changes can be done to a single table by right-clicking onto the <table> tag in the left structure bar and selecting Table Style > Edit Table Style from the context menu. This displays a page of generic settings for the table, allowing changes to be made to a single-instance table.
After local changes are made to the table using the Properties sheet, it may be necessary to apply these properties by right-clicking onto the <table> tag in the left structure bar and selecting Table Style > Reset Table Style.
See Also