Inserting & Formatting Images
Image Style
When an image in the form of a .jpg, png etc. is inserted into the editor, it is annotated as <img> in the left and top structure bar. In so doing, it associates all style formatting to the <img> style setting in the stylesheet associated to the topic.
All images inserted into the editor can be controlled through the style elements in the stylesheet associated to the topics, as well as individual properties such as :
-
Size
-
Print Size
-
Position
-
Thumbnail
-
Borders & Margins
-
Background
To adjust the properties locally of an inserted image, left-click next to the image, then navigate to the left or top structure bar and right-click onto Image Properties in the context menu. This displays a page containing the above properties which allow the image to be adjusted without affecting the style of other images in the documentation.
Hyperlink Image
An inserted image can be hyperlinked to navigate to another part of the documentation by right-clicking onto the inserted image in the editor and selecting Hyperlink Image. The image can be linked to the following elements :
-
A file within the current project
-
A place in the current document, usually referenced by a style heading or a bookmark.
-
An external file - in cases where external files are referenced, these will be compiled with the main published output.
-
A website URL
-
An email address
-
An external HTML help file
Image Map
An image can be 'mapped' to contain links to other portions of the documentation, or a website.
To map a portion of an image, do the following :
Right-click onto the inserted image in the editor and select Image Map from the local editor. A copy of the image will appear in the editing box.
-
Select the rectangular frame-shape from the Edit toolbar.
-
Draw a rectangle around the area to map.
-
Input the page or URL link.
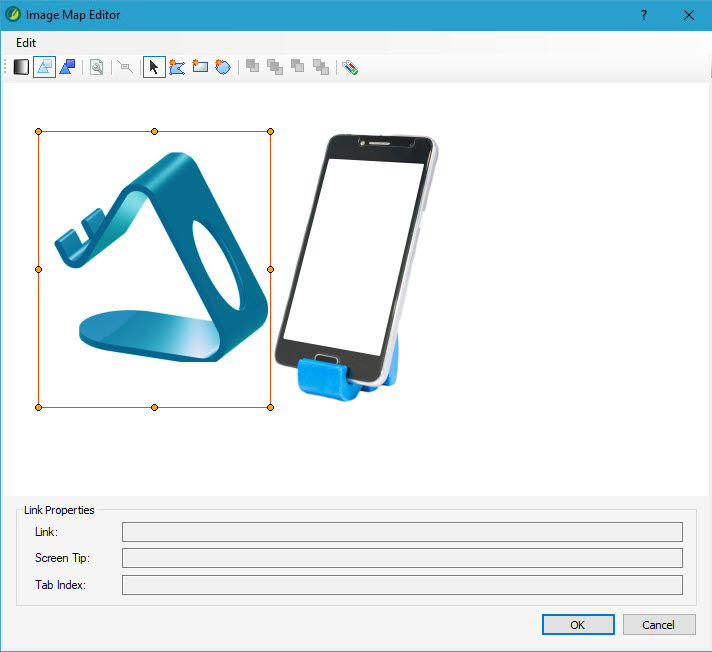
Mapping an area of an image
Multiple portions of the image can be mapped using the image mapping tool.
Image Screen Tip
An image can contain a 'screen tip' which is viewed when the cursor is rolled over the image in the published content.
To insert a screen tip, do the following :
-
Right-click onto the inserted image in the editor and select Image Properties from the context menu.
-
Navigate to the Screen-Tip field and input the text to appear when the cursor is either clicked or rolled-over the image in the published content.
-
Select OK.
See Also