Creating and Inserting Snippets
Snippets
A Snippet is a reusable piece of content or code that can be inserted into various parts of documentation. Snippets are used to manage and maintain consistency across multiple topics or pages where standardised text appears.
A Snippet can include a variety of elements such as text, images, tables, or even advanced formatting and styling. By creating and using Snippets, duplication of content in multiple locations throughout the document stack is avoided.
Typically, the content of a Snippet file, when updated, allows the contents of the Snippet to be cascaded to all inserted instances of the Snippet.
Creating a New Snippet
Snippet files are stored in the \Resources\Snippets folder.
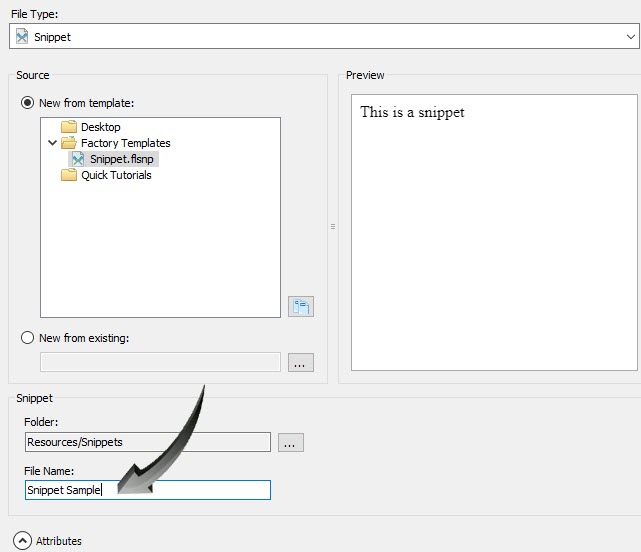
A Snippet is created within the project using Project > New > Add Snippet and providing a name in the File Name field. This will create a blank page in the xml editor which can be used to create or insert standard text, images, tables, multi-media or any content which is repeated in the same format throughout the documentation.
-
Navigate to Project > New > Add Snippet > (name of snippet). Separate folders within the Snippets folder can be created if necessary.
-
Select Add to add the new Snippet to the Snippets folder.
Creating a New Snippet
-
A new file with the suffix (snippetname).flsnp is created within the text editor.
-
Input any text or media content which is required as formatted throughout the documentation. A sample is shown below.
Style formatting within the Snippet is not necessary as it will adopt the stylesheet properties of the topic into which it is inserted.
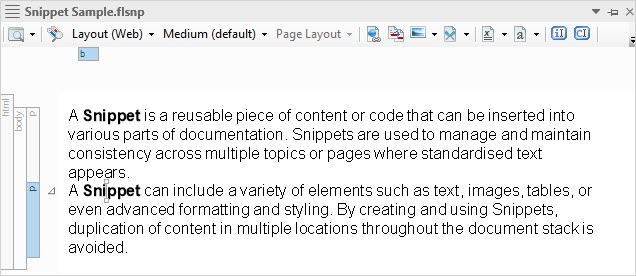
Snippet Sample
Creating a Local Snippet.
A snippet can be created locally within the editor and saved automatically to a named file in the Snippets folder. The text for the intended snippet must be in the editor.
-
Navigate to, then left-click onto the tag in the left structure bar alongside the text which contains the intended snippet.
-
Right-click over the tag and select Create Snippet from the local menu.
-
Use the Create Snippet properties page to change or accept the text as a Snippet.
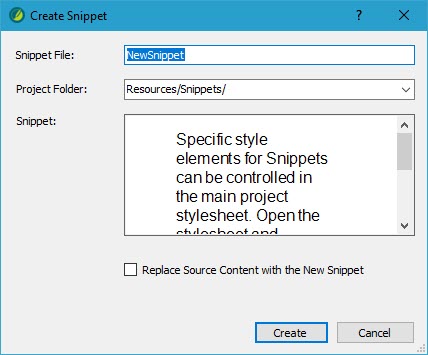
Creating a Local Snippet
Inserting a Snippet
Snippets can be inserted into any location within a topic. Snippets are tagged as <MadCap:snippetBlock> in the top and left structure bars.
-
Place the cursor in the location in the topic where the Snippet is to be inserted.
-
Navigate to Insert > Snippet .
-
Select the Snippet from the default directory structure to insert into the topic. The Snippet named Snippet Sample is shown inserted into the editor below.
A Snippet is a reusable piece of content or code that can be inserted into various parts of documentation. Snippets are used to manage and maintain consistency across multiple topics or pages where standardised text appears.
A Snippet can include a variety of elements such as text, images, tables, or even advanced formatting and styling. By creating and using Snippets, duplication of content in multiple locations throughout the document stack is avoided.
Specific style elements for Snippets can be controlled in the main project stylesheet. Open the stylesheet and navigate to MadCap | snippet Block. All style properties associated to Snippets will appear in the right pane.
Updating a Snippet
The contents of updated snippets will cascade to all inserted instances of the snippet in the documentation, providing the snippet has not been unbound by converting it to text.
-
Navigate to the Content Explorer Panel, then to the Resources > Snippets folder. Select the Snippet to update.
-
Make the updates to the Snippet and save the file. In the example below, the font colour has been changed in the second paragraph.
A Snippet is a reusable piece of content or code that can be inserted into various parts of documentation. Snippets are used to manage and maintain consistency across multiple topics or pages where standardised text appears.
A Snippet can include a variety of elements such as text, images, tables, or even advanced formatting and styling. By creating and using Snippets, duplication of content in multiple locations throughout the document stack is avoided.
Converting a Snippet to Text
Frequently, localised insertions of Snippets need to be changed without changing the context or style of the original Snippet. This will allow updates to be made in the editor of the inserted snippet only and will not affect other inserted instances of the snippet in the documentation.
-
Place the cursor in the location in the topic where the Snippet is to be inserted.
-
Navigate to Insert > Snippet .
-
Select the Snippet from the default directory structure to insert into the topic.
-
Right-click onto the tag in the left or top structure bar and select Convert to Text from the context menu. In the example below, the snippet has been converted to normal paragraph <p> text and can be updated as normal text.
See Also