Lights
Light Source Properties
Light sources respond in a similar manner to drawing objects when placed in the editor.
Light source objects can be moved or rotated using the X-Y-Z selector handles to perform the necessary manipulations. For this reason, the preferred Selector Settings can be applied. Navigate here for more information on using the Classic or Conceptual selector settings.
All light source objects within the editor can be selected using Edit > Select by > Entity Type > Lights.
The properties of each light source differ according to their type, and their functions and positions can be adjusting using the Properties sheet.
Adding Lights to a Scene
Tools > Palettes > Design Director > Lights > New Light
New lights can be added or removed from the scene using either the Design Director or the View > Lights options.
The light source type, power and position can be determined prior to insertion into the scene. The following light sources are available :
A new light can be added to the scene using either the Design Director or the Lights dialog. An example of this is shown below using the Design Director.
Example
- Select Tools > Palettes > Design Director to seat the Design Director in the editor.
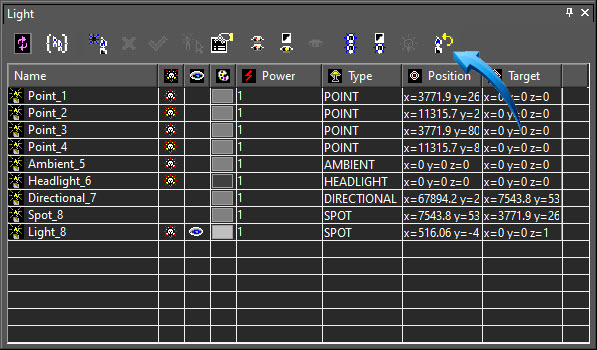
- Select the New Light option from the top menu band. A new light will be added to the scene using an arbitrary name at this stage. Click OK.
- Move to the information pane and click onto the type option shown below. Set the required light. In this example, the Spot light source is selected.

- The new light is inserted into the editor and is both activated and visible, shown outlined above.
Selecting a Light Source in the Editor
Tools > Palettes > Design Director > Lights > (select light) > Select By
A specific light source in the editor can be selected using the Design Director.
- Select the Light category in the Design Director.
- Select the Light source in the information pane.
- Select the Select By option in the menu panel. In the example below, the Point_4 light source is selected.
TIP
Light sources are treated as drawing objects when placed in the editor. When the light object is selected, it is automatically highlighted in the Design Director and the editor, shown below
Light sources in the editor can be selected collectively by selecting Edit > Select by > Entity Type > Lights.

Selecting a light source object in the scene
Removing a Light source
Tools > Palettes > Design Director > Lights > Delete Light
View > Lights > Delete Light
A light source can be removed from the scene using the following methods :
- Delete the light source object in the editor.
- Select the Light in the Design Director, then select Delete Light.
- Select the Light in the Lights dialog, then select Delete Light.
Modifying Light Source Properties
The properties of a light source differ depending upon which light is used. The relevant light properties can be modified using any of the following methods :
- Double-click onto the light source in the editor, select Light from the Properties sheet.
or
- Select the light source in the Design Director > Light palette. Select the Properties icon in the top menu bar.
or
- Select the light source in the View > Light dialog. Select the Properties icon in the top menu bar.
Below is an example of the Properties presented when modifying a Spotlight.
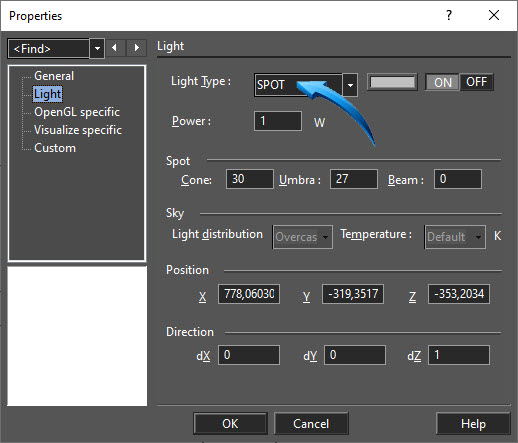
Modifying a Spotlight
Restoring the Default Light Sources
View > Lights > Restore Default
The default position and properties of light sources which are added to a scene are inserted using a predefined template.
This template can be reloaded to the default setting which places the light sources in their original locations determined by the template. This will also reset any light source properties to their default settings.
Select View > Lights > Restore Default, shown below.
Restoring the lights template defaults
Creating a Lights Template
View > Lights > Restore Default
When light sources are placed in a scene which are the preferred settings for a specific scene, a new template can be created which retains the position and properties of these light sources. This allows the template to be restored at any stage of the design.
- Select the Light option in the Design Director
- Select New Lights Template from the menu bar at the top of the Design Director.
- Name the new template. This template is stored in the current drawing only.

New Lights Template
- To activate the new template, right-click onto the newly created template in the Light category in the Design Director and select Activate from the context menu. This action will restore the lights to the new template conditions.
NOTE : Light sources appear as objects in the editor when the light is activated and visible, shown outlined below.

Worked Example
- Draw any 3D object in the editor or download and open the Lights drawing. All objects in this design are stored as separate parts in the Blocks palette should you wish to experiment with multiple scenes.
- Open the Design Director and select the Lights option.
- Select any light source and experiment with adjusting the position, range and intensity of the light beam
See Also